It's been a year since we installed the maple hardwood countertops.
How are they holding up?
What would I do differently?
Most valuable lessons learned?
How are they holding up?
We couldn't be happier. I'd add photos, but they look just about the same as my last post!
The choice of Behlert's Rock Hard table Top Varnish was excellent! I must admit, I had a few second thoughts about it (cost!) but it is wearing like iron! No stains or any sign of wear.
I do admit, we baby the countertops, wiping up stains (usually) within a few minutes. But the island hosts the cooktop and there have been splatters and splashes of hot oil, liquids, etc.
What would I do differently?
I did most of the layup and glue work in the late summer when humidity was high. In addition, a few of the boards had a very slight bend or warp. As a result, there are 3-4 places where very small gaps opened up on the top where two boards were glued together. I believe this could have been prevented had I been fussier with selecting only the straightest pieces and using more and heavier clamps.
The downside of being more picky is wood scrap - but if you have another use for the stuff, that's not a big deal. Also, if you are not far from the mill, you could return for exchange. All in all, the extra cost would have been worth it.
I had two 3/4" pipe clamps and used them when I needed a lot of "squeeze." I should have sprung for four more of these heavier pipe clamps to really put a heavy squeeze over the whole length.
I selected to use short pieces (5" over all length) for the section to the left of the cooktop. I had originally planned on using a single long piece and I should have. Several small gaps opened up in this section. It is very difficult to clamp very short pieces.
Most valuable lessons learned?
Be picky for straight wood.
Don't get hung up on a relatively small expense (e.g. varnish at $28/qt) if the contribution is a small fraction of overall project expense.
Lay up and glue in low humidity (i.e. winter) if possible.
You can't have too much clamping pressure.
Use 200 grit or higher on your sanders including the belt sander.
Start small - I did a roll around cart top first.
If you build in the basement, make a full size light weight mockup to make sure you can get it it out of the basement!
Above all, if you think you have the skills and space to do something like this - Go for it!
I hope this blog helps someone do a similar project.
If you do, post a comment on my blog.
Good luck and God bless!
Sunday, October 26, 2014
Tuesday, October 22, 2013
The Big Plunge - The L-Shaped Countertop!
We are very pleased with the way the island countertop is wearing and I decided to "lower my rack" and charge!
Time to tackle the large L-shaped main countertop!
I wanted to build in the basement but I was concerned with whether we could get the beats up the stairs!
So, we built a full size piece out of scrap plywood and carried it up twice!
Tight but it works!
Next - more coarses of flooring.
There are 8 coarses total and I will make a few posts to show progress.
Time to tackle the large L-shaped main countertop!
I wanted to build in the basement but I was concerned with whether we could get the beats up the stairs!
So, we built a full size piece out of scrap plywood and carried it up twice!
Tight but it works!
 |
| So we measured and cut the underlayment . . . |
 |
| . . . and connected them with a "gusset" |
 |
| Used Dewalt Biscuit cutter to create new groove for end (the board ended with a tongue - Murphy's law!) |
 |
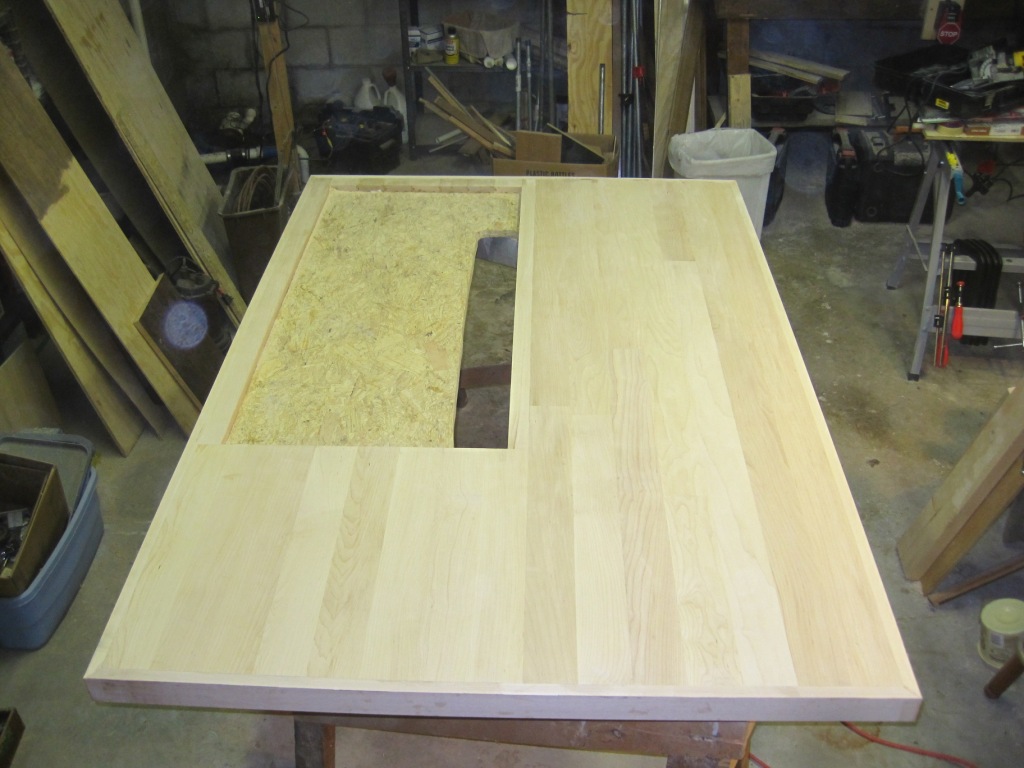
| Here is layup of first course of flooring. Corner will be a herringbone pattern. |
 |
| The overlapping flooring from the sink side will give strength to the join and ultimately we will not need the gusset. |
Next - more coarses of flooring.
There are 8 coarses total and I will make a few posts to show progress.
Friday, July 5, 2013
Finito! Island Counter Top Completed and Installed!
Finito! Island Counter Top Completed and Installed!
After a great deal of sanding, I applied three coats of Behlen's Rock Hard Table Top Urethane Varnish. I used the satin variety.
The varnish sets up pretty quick so (as instructed on the label) you cannot overcoat varnish you've put down 2 minutes ago.
 |
| This is a shot from a 6' stepladder of the finished top in the workshop. Last weekend, we had a visit from our nephew and he and our son carried the finished top to the garage, where we sat it on an old throw rugs and padded it thoroughly. |
 |
| First thing is to pull the cooktop. When we built, we installed a Jenn Air three bay electric cooktop. The center bay will host either a grill or an additional set of two electric elements. |
 |
| After double checking the breaker was off, I disconnected the 6-3 w/ground feed cable. This is the size of a garden hose! |
 |
| Then, it's time to pull the old top off. |
 |
| We wanted 115VAC outlets accessible from the countertop, so I cut two holes, one near each end of the countertop, but accessible from underneath. Of course, being in a kitchen, a GFCI protected outlet is required by code. |
 |
| I came across a 25' spool of armored cable which promised to be a lot easier to run under the counter than would conduit. Stripping starts with "unwinding" armor sheath. |
 |
| Here is the island base cabinet with the two new boxes prepped for the outlets. |
 | |
| After wiring the outlets, I added the braces. I opted for metal braces rather than corbel mainly from a "knee knocker" standpoint, although $7 for a metal brace also had an appeal when weighed against a $120 corbel! The GFCI is visible just behind the end brace (the end braces do not have diagonal bracing but get their stiffness from the U-channel cross section. |
 |
| Of course, the black brackets required painted screws! I simply pushed them into cardboard and shot them with a spray can. |
 |
| Theresa and I carried the new top in from the garage (don't tell my knee replacement doctor I'm pretty sure my share exceeded 25#!) and set it in place. |
 |
| Painters tape to help protect the finish as I complete the cutout for the cooktop. |
 |
| Holes in each corner to begin with |
 |
| Scrolling saw to complete the cutout. I slipped a piece of 2X4 under the top to keep me from accidentally hitting the cabinet base below |
 |
| Here's the finished top ready for the cook top. I shimmed the top in a couple of places to achieve level and attached it using the same screws I took out of the old top. |
 |
| The cook top back in place. |
 |
| All the drawers, doors, elements, etc in place and tested! All is ready for service! |
We will use this top for the next few months and make the decision then whether to go ahead and start on the L-shaped main counter top. Stay tuned!
Friday, June 21, 2013
Final Layup Complete - Now for the Sanding!
 |
| The final band board is glued and clamped! It was just too much to get both band boards on at the same time - not enough clamps and too little working time for the glue. So I did them one at a time! |
 |
| This shot of the finished product is from a 6' stepladder. The last of the clamps are back in their
storage position and its time for the sanders to do their thing! I
sanded for about 35-40 minutes today with 80 grit then 120 grit. I get sloppy when I get tired, so I put the sander down for now and will resume Monday. |
 |
| I set the router to a maximum cut with my bit. The bit is actually a Roman Ogee bit but when set as I have it, it simply rounds the edge. It has a bearing on the end to allow freehand cuts. The router has been so long mounted to the router table, I had to find the lower plate! |
 |
| I had no idea how hard it would be to run the router around the top of the countertop to round the edges! I don't mean it was physically hard, its just that a router can cut wood really fast and any slip-up and two weeks hard work is down the drain! The only time I've had similar feelings of impending doom was when I "Dutched" an entry door in Greenfield house! Cutting a $250 door - keep in mind this was 1977! - was incredibly hard! But, as then, I double and triple checked everything and "let 'er fly!" Turned out great! |
 |
| I did lower edge and corners as well |
 |
| I followed up with about an hour of sanding with the
Black & Decker orbital sander with 80 grit paper. Tomorrow, I'll
load 100 grit, then 120. I could be varnishing by Wednesday! It is looking amazing and I am so happy I learned on the rollaround top! |
 |
| I saw my good friend at church today and he suggested not to use 80 grit at all but to get through the 120 grit and then on to higher grits quickly. Since my finishing experience is extremely limited, I tried Jim's suggestion and it worked quite well! I think the heavier grit had actually been making most of the marks I was trying to sand out! So tonight, I used some 220 followed by 320 grit paper and it is turning out amazing! Jim said he does his finish sanding with 1500 grit. I checked and we have quite a supply of 600 grit but nothing finer. We used all the really fine stuff when we painted the Camaro a million years ago! So I'm thinking the final sanding will be with 600 grit. But there's still a lot to do with the 220 & 320. |
Now I need to tap one of my friends to come over and help me gently flip this baby over so I can sand the bottom!
This baby could go into service by the Fourth of July!
Saturday, June 15, 2013
Island Structure Layup Complete!
Island Structure Layup Complete!
The last of the clamps are back in their storage position and its time for the sanders to do their thing!
Next - Sanding, more sanding, even more sanding, then finish sanding with the B&D orbital sander! Then, varnish!
The last of the clamps are back in their storage position and its time for the sanders to do their thing!
 |
| The last of the band boards is in place and the layup is "curing." |
 |
| With the clamps removed, about 20 minutes with 80 grit on the belt sander removed almost all the stains and glue! |
 | |
| This shot is from nearly directly overhead (using a 6' step ladder). I changed to 120 grit (finest belt sandpaper I could find) and sanded another 20 minutes or so. I get sloppy when I get tired, so I put the sander down for now and will resume Monday. |
Next - Sanding, more sanding, even more sanding, then finish sanding with the B&D orbital sander! Then, varnish!
Wednesday, June 12, 2013
Island Structure Nearly Complete
Island
Structure Nearly Complete
 |
| Adding courses was very straightforward with the only added complexity being a 3-D clamping requirement – I had to press the flooring tightly to the subfloor, squeeze against the previous course, and squeeze end-on to make sure the courses made up of 2 pieces of flooring were tightly bonded. |
 |
| The final courses are added to rim the cooktop cutout. I decided to piece the final courses since the edge was thin and the structure is supported there by the cabinet base. |
 |
Try
as I might, there was enough variation in the ends that a tight glue joint was
not to be. So I clamped a piece of ¼” plywood to the top, using an old piece of
laminate to fill in the cutout area. The plywood was clamped with the “factory”
edge as the guide since it would be the straightest. The thin wood was needed
due to the large overhang of the hand saw motor. Final step in prep was to apply a layer of
masking tape. The tape needs to be down tight to help prevent tearouts of the
flooring as the saw blade passes up through.
I also set the depth of cut to a minimum to keep the angle of the blade
at a minimum as it exits the work.
|
 |
| Here trimming the south end. |
 |
| Once all the trimming was done, it was time to cut the bandboards to the proper width. In anticipation, I added a dust collection system to my table saw. |
 |
| The dust passes through a vortex swirler that settles about 90% which keeps the shop vac from getting clogged with sawdust so quickly. I’ve used this dust collector with the jointer/planer seen here for quite a while but just now added it to the saw. |
 | |
| I set the ripping fence to the desired width and passed all four pieces through in sequence to insure uniformity. As you can see, I am old school and don’t use my blade guard. I DO NOT RECOMMEND THIS PRACTICE! |
 |
| Here is the east side band board during trimming to length. I used the pressure clamps as a third hand to hold the piece since I am working alone. |
 |
| I decided to use my biscuit jointer to attach the band boards since the dowels were not very satisfactory. I set the Dewalt biscuit jointer to just above the center of the flooring and depth for a #10 biscuit. |
 |
| I clamped the bandboard on the piece and marked for a biscuit every 10”. Then I cut the slots. The band board itself was more difficult since it is unattached. I created a stack using a 2X6 scrap and a piece of ½” plywood to create a backing piece. Then I could align the cutter properly. |
 |
| Here is the result for the east band board. |
 |
| The biscuit jointer leaves a small exit tear-out which I remove with a knife to keep it from getting in the way of a tight glue joint. |
 |
| Here is the east band board during dry-fitting – you can see the biscuits in the near end. |
 |
| Here, both east and west band boards are glued and clamped. |
 |
|
Same
scene only seen from the north end (BTW: north – south – east – west alludes to
ultimate orientation in kitchen).
Tomorrow –
Cut and glue North & South band boards!
Then,
trying to master the belt sander!
|
Wednesday, June 5, 2013
Six Courses Commplete!
The island is coming along nicely!
After the first couple of courses, it was clear I would need additional deep throated C-clamps, so on Sunday, we stopped by Harbor Freight and picked up two more, giving a total of four. I can still use the 2X4 with standard 5" C-clamps in a pinch, but these will be well worth the $10/clamp they cost!
This three dimensional clamping is challenging!
I have developed a method that seems to work well:
1) align and clamp the length, squeezing toward the last full course until the glue oozes the entire length of the joint;
2) Clamp center joint using pipe clamp, same criterion - oozing glue;
3) Clamp vertically using dimensional press pieces and C-clamps at least six places (every 8-10 inches) until glue oozes from under board.
This morning, I laid up course #6 with a 22" and a 47" piece. The 22" pieces was straight and flat but the 47" piece had a little bow (about 1/8"). Fortunately, the bow was away from the 5th course (when center was tight, end stood out), so I used a 3/4" pipe clamp to secure inboard end and the n used another 3/4" pipe clamp to draw the end tight. I used the 1/2" long pipe clamp to then draw center joint tight, and used pieces of 2X4 to clamp vertically (the long 2X4 would not slip under the pipe clamps).
Tomorrow I will lay up last full course.
After that, I have decided to use a partial piece (the length of the cutout), ripping it on the table saw and end butting it with a parial piece to complete the course. Then, a series of 21" pieces (which I may try to lay up 2 or even 3 at a time.
Photos at that point!
Thanks for following this blog!
Feel free to leave comments.
Subscribe to:
Comments (Atom)