Wednesday, June 12, 2013

Island Structure Nearly Complete


Island Structure Nearly Complete

Adding courses was very straightforward with the only added complexity being a 3-D clamping requirement – I had to press the flooring tightly to the subfloor, squeeze against the previous course, and squeeze end-on to make sure the courses made up of 2 pieces of flooring were tightly bonded.

The final courses are added to rim the cooktop cutout. I decided to piece the final courses since the edge was thin and the structure is supported there by the cabinet base.


Try as I might, there was enough variation in the ends that a tight glue joint was not to be. So I clamped a piece of ¼” plywood to the top, using an old piece of laminate to fill in the cutout area. The plywood was clamped with the “factory” edge as the guide since it would be the straightest. The thin wood was needed due to the large overhang of the hand saw motor.  Final step in prep was to apply a layer of masking tape. The tape needs to be down tight to help prevent tearouts of the flooring as the saw blade passes up through.  I also set the depth of cut to a minimum to keep the angle of the blade at a minimum as it exits the work.

Here trimming the south end.

Once all the trimming was done, it was time to cut the bandboards to the proper width.  In anticipation, I added a dust collection system to my table saw.

The dust passes through a vortex swirler that settles about 90% which keeps the shop vac from getting clogged with sawdust so quickly.  I’ve used this dust collector with the jointer/planer seen here for quite a while but just now added it to the saw.

I set the ripping fence to the desired width and passed all four pieces through in sequence to insure uniformity.  As you can see, I am old school and don’t use my blade guard. I DO NOT RECOMMEND THIS PRACTICE!

Here is the east side band board during trimming to length.  I used the pressure clamps as a third hand to hold the piece since I am working alone. 
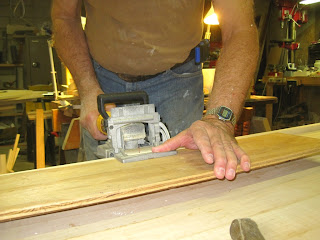
I decided to use my biscuit jointer to attach the band boards since the dowels were not very satisfactory. I set the Dewalt biscuit jointer to just above the center of the flooring and depth for a #10 biscuit.

I clamped the bandboard on the piece and marked for a biscuit every 10”. Then I cut the slots. The band board itself was more difficult since it is unattached. I created a stack using a 2X6 scrap and a piece of ½” plywood to create a backing piece. Then I could align the cutter properly.

Here is the result for the east band board.

The biscuit jointer leaves a small exit tear-out which I remove with a knife to keep it from getting in the way of a tight glue joint.
Here is the east band board during dry-fitting – you can see the biscuits in the near end. 

Here, both east and west band boards are glued and clamped.

Same scene only seen from the north end (BTW: north – south – east – west alludes to ultimate orientation in kitchen).

Tomorrow – Cut and glue North & South band boards! 
Then, trying to master the belt sander!

No comments:

Post a Comment