Thursday, May 23, 2013

Final Assembly and Finishing


Ready for the End – of the Roll-Around Counter Top That Is!
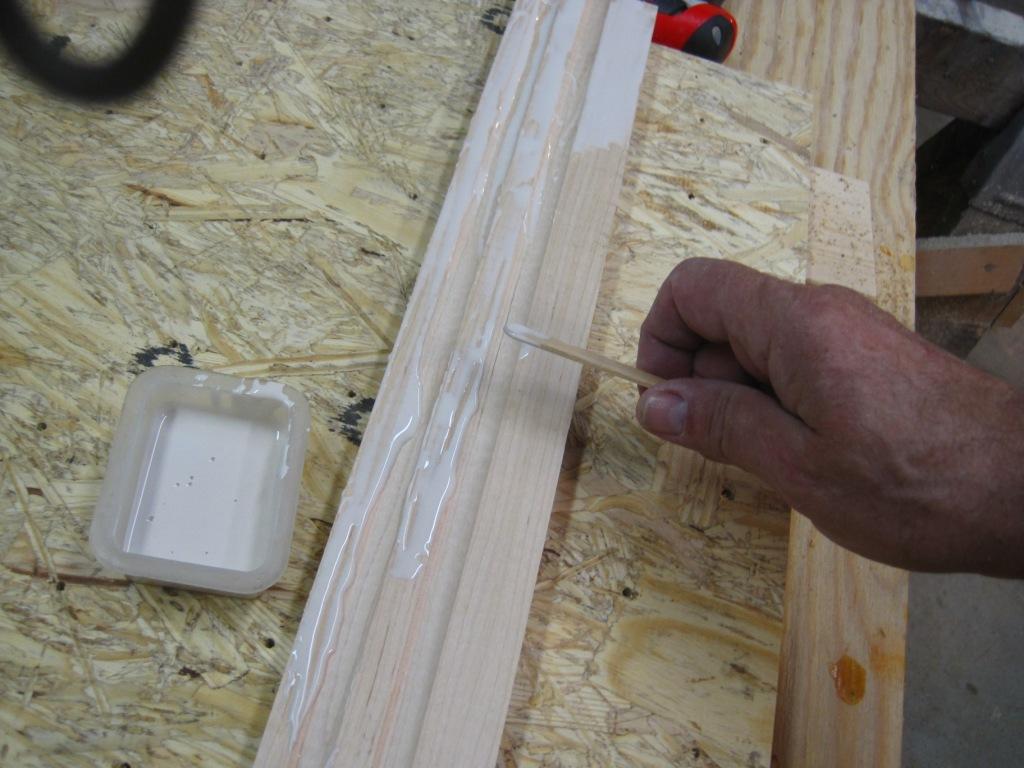


I was unhappy with the way the end pieces lined up when I used the dowel pins, so I decided to go without any mechanical support, i.e. just the glue. I figure if it comes loose, I can always use the brad nailer when I reattach
The piece was just slightly too long for my pressure clamps, so I broke out the long pieces of pipe and shifted the pipe clamp hardware to them.  Vertical alignment was achieved using cheek blocks with a C-clamp. Again, I used plastic grocery bags as a release sheet between the blocks and the work. I did one end at a time - this is the final layup.


Once the work was completely set up, I used a block plane to even out the slight differences in the side and end band boards. (I found the plane in a flea market in Fla for $5 and my son Dave sharpened it to the point you can almost shave with it!)


Then I sanded bottom first (with the piece resting on an old throw rug) using 80 grit in the Black & Decker commercial grade orbital sander. I used multiple passes up and down while rocking the sander side-to-side  to “break” the sharp edge.
Sanded sides of band board, then turned the piece over and sanded the top. 
Changed sanding paper frequently - used 4 pieces of 80 grit and 2 pieces 120  grit.
Once it was all smooth, finish sanded with 120 grit.

Brushed dust off and then went over piece with a tack cloth.


Final piece ready for first coat of varnish – which I applied. After it sets up, I’ll sand again with 320 grit and apply the second coat of varnish. (I took a photo but it looks weird since some of the varnish has already started to dry leaving an uneven finish appearance.)

Next: Final coats of varnish and installation!

Monday, May 13, 2013

Monday May 13 - Fitting Band Boards


As it happens, the work is not perfectly flat! Don’t know if it is a thermal coefficient of expansion “fight” between the Maple and the Advantech or what.
Anyway, today, I completed the band board prep. Details below!

I decided on the stop board method with finger check, loosening the clamp if necessary to bring tops of band board into alignment with counter top. Then a tap with the rawhide mallet and a trip to the drill press.

End board being fitted . . .

. .  . and marked for miter saw cut . . .
. . . with the first cut just a smidgen long (“leave the line”).

Drilling side holes using dowling jig.
(Important tip: If you have screws in the countertop, don’t try to drill through them! It really does a number on the drill bit!)

Once again, using rawhide mallet so as to not mar the wood.

Once the side band board is cut, the process of fitting the miter corners begins. The key is patience – you can always cut more off but I haven’t found a supplier for 
“grow-some-board”
When you get really close, with the power miter box, you can swing the blade down (not running), bring the work right up to the side of the blade, hold it there while you make a cut. David and I call this “kissing the wood” – takes a very small amount of wood off.  This whole process may take 8-12 trips to the power miter box per corner, but its worth it when you get that perfect fit!

Ready to glue up side pieces! Now that all four corners have perfect fits, time to glue the side pieces. A cotton swab is perfect to wet the holes. The flat wood is again wet with the acid brush.

Here’s the piece with the two side pieces glued and clamped. The dark areas are just damp with water used to remove excess glue. 
Since the grain on the side pieces runs with the grain on the counter top, I can have it attached when I do my final passes with the belt sander.
I’ll clamp the belt sander into a woodworking vice to create a table belt sander and use that to dress the end pieces down to final fit.


Next: Gluing end pieces and final finish sanding with orbital sander.

Friday, May 10, 2013

Sanding and Edge Band Board Experiments


Friday May 10, 2013


I noticed that the boards had apparently NOT been through the sander at the mill inasmuch as the planer marks were pretty evident.  I worked it for a while with the Black & Decker commercial orbital sander and decided I needed a “bigger gun.”


I checked a Popular Mechanics review of belt sanders and they had good words for the Sears and the Chicago Electric (sold by Harbor Freight). As it happens, the Chicago Electric is on sale and is about half whet the Sears unit is, so I made the trek to Harbor Freight.

I fired the sander up and was making great headway but did not appreciate the removal rate, scratching, and differences in the effect on heartwood and sapwood!

I eventually brought the B&D orbital sander back after I had sanded the boards free from the planer marks. I have some learning to do with this belt sander!


Finally, I went to work on the “band board” which will surround the edge of the piece. I drilled one end of the countertop using a Sears dowelling jig I bought years ago.


I used some dowel marking inserts to establish the desired location for the mating holes in the band board. . . .


 . . .  and drilled them using the drill press with a depth stop set.


The aligment was not perfect (a tiny bit “tall” at one end), so I decided to try again on a fresh piece, this time using the dowelling jig and the drill press.

The results were way worse. I must cogitate on this. Maybe I need to dowel it a smidgen “tall” and gradually work it down with a plane? Need to consult #1 son.
Stay tuned!


Wednesday, May 8, 2013

When we built our house in 1986, we finished the interior ourselves. We chose some very nice cherry kitchen cabinets (Continental Kitchens in Shelbyville) and they have held up very nicely.
Due to financial constraints, we installed laminate countertops which looked nice but are past their prime, to say the least. The substrate is de-laminating over the dishwasher and there are numerous chips and peels. Time for new countertops. Have you shopped for countertops lately? All of the hard surfaces have some flaw- they either absorb oils, scratch, or discolor is a hot pan is placed on them.
While watching a TV cooking show one day, I noticed that their countertops were wood! So I did a little surfing and came up with several ideas. The one I liked best was using maple hardwood flooring. Maple trees are indginous to Indiana, produce very hard wood (think basketball floor!) and are a lovely pale off-white color, very similar to the laminate lights color (did not want dark counters withe the dark cabinets.
Did some research and found a mill in Spencer Indiana - 40 mile drive - that will sell unfinished flooring! 
A few weeks ago, David, our son, and I drove down and picked up 60 square feet of 3" unfinished maple flooring milled with tongues & grooves.
I have been planning and buying materials ever since and am now ready to commence.
On the advice of Scott Nesbitt, a good friend and jack of all trades, I am using AdvanTech subfloor as the substrate (the flooring tongue & groove system assumes a strong substrate to support the floor).
Found the AdvanTech at Carter-Lee in Indy and went there with good friend (and pickup truck owner) Terry Pavlack and bought three sheets (one for the island and two for the main L-shaped countertop. Last week, David came down and we trimmed the island piece to size with a hand held power saw (using a 2X4 clamped as a saw guide).
One of the scraps is big enough to act as a substrate for a small utility cart, and I decided to start small and learn before I jumped into teh deep end.
This morning, I cut the AdvanTech to size and selected pieces of flooring. The next episode will chronicle the assembly of that piece. 
     

Roll Around Cart Top - Part II


Wednesday May 8
Went to Menard’s and bought a gallon of Titebond III and some clear maple to act as a band board. I bought 1X2 and it is approx 1/16” higher (in the 2” dimension) than the substrate + flooring stack!!! I love it when a plan comes together!
Anyway, back to the last three courses of flooring:


I first re-drilled the holes for the second set of screws (that had broken into the grooves yesterday). I drilled all but the first and last course at an angle to try to keep the boards drawn together. I suppose once the glue is fully set, I should be able to remove some or all of these screws


Applying glue for fourth course. The acid brushes work great and allow proper wetting of all the tongue and groove surfaces that need it.


Once again, the wood flooring doesn’t marry intimately with the substrate, so I used the “spring clamp” using some scrap 2X6 and a couple of 5” C-clamps. Once the screws are tightened, the clamp can be removed.

Here’s a wider view of the “spring clamp” in place. I am able to pick up this piece and move it but am not sure what I’ll do with the island or L-shaped counter top.


The sixth and final course is applied and pressure clamped with C-clamps and edge clamped with squeeze clamps except one pesky place that needed a little extra squeeze from a pipe clamp.


I use light clamping squeeze clamps for most of the work but employ the extra oomph that a pipe clamp can give if I have a seam that is not quite married completely (glue oozing). The light clamps have built in rubber pads but the pipe clamps require press blocks. To keep from gluing these to the piece accidentally, I use old plastic grocery bags as release or “slip” sheets.


The edges of the flooring and substrate do not align perfectly (they did during the dry layup), so either the clamps skewed the wood or I didn’t get the first course perfect. No big deal – I’ll use the hand power saw with a guide piece to trim the edges before adding the edge band.


Tomorrow – Edge band cutting and application.
 

Tuesday, May 7, 2013

Roll Around Cart Top

Roll Around Cart Top
I decided to begin with a small, simple job first and work my way up.

I cut the AdvantTech base to exact size on the table saw and then used the table saw to trim the tongue off the first edge and the groove off the last.
I followed that up with a pass across the jointer to produce a flat, smooth surface.
Then to the sliding miter saw for careful trim of left edge.


A quick check of first two showed that the saw was cutting neither square or even straight edges!

So the old Ryobi power miter box (bought when we applied trim in house 25 years ago!) came out and produced perfect edges.

A little playing with available pieces yielded an acceptable layout.

By carefully looking at all available pieces, I was able to keep the scrap to an incredibly small amount!

I decided to glue each course with Titebond III, a glue rated for outdoor use but to use screws to produce the required clamping pressure while the glue set.


I drilled a grid using my little B&D Lithium Ion pocket drill.    
The Titebond III instructions call for a generous application!
“The bigger the blob, the better the job!”

I have to admit, I was a little nervous when I applied the glue to my first course. I use orange sticks and learned that the glue is thin enough for a brush and the orange stick would not be very good once I had to deal with tongue and groove gluing.

Wipe away excess glue with a damp cloth

C-clamps hold the piece in place while I . . . .
Use my 3/8 Milwaukee variable speed drill to seat the 1.25” fine thread drywall screws.

Next night, back for additional courses. Visited Home Depot and bought 6 acid brushes, (so called because plumbers use these to apply acid to pipes prior to sweating the fittings) for glue application. 


These brushes worked very well indeed and the Titebond III was easy to apply.

Edge and end clamps hold the second course while I carefully invert the piece to apply the screws in the back.

While adding the third course, the ends were not perfectly aligned but the piece would not slide in the Titebond III! I wailed on it with my little rawhide mallet to no avail. I finally broke out a 3/4” pipe clamp and brought it into line. 
After edge and end clamping, I inserted the screws in the back but the front course broke through the groove of the board (which would cause great difficulty in applying the final course). So I backed the crews out (I’ll make the holes vertical instead of a slight angle as I had planned – at least on the course of holes closest to the groove edge of the flooring).

As a result, in a couple of places the maple flooring and substrate were clearly not “married” and a visible gap existed between the substrate and the flooring. So I added a couple of pieces of dimensional wood, lightly clamped at the back and more forcefully clamped at the front where the gap was.


Worked like a charm! But left me with a piece that had to stay in the clamp overnight.

Tomorrow, drill second course of holes vertically and add final three courses of flooring.
I am so glad I decided to do this little roll-around cart top first since it allows me to learn on a non-critical piece.