Friday, June 21, 2013

Final Layup Complete - Now for the Sanding!

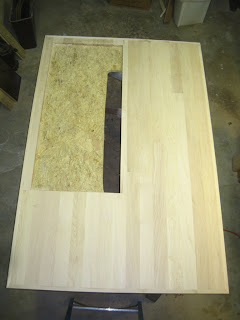
The final band board is glued and clamped! It was just too much to get both band boards on at the same time - not enough clamps and too little working time for the glue.  So I did them one at a time!

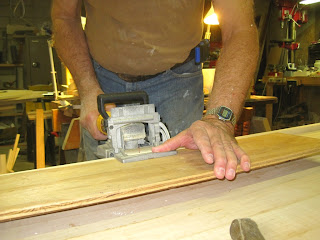
This shot of the finished product is from a 6' stepladder. The last of the clamps are back in their storage position and its time for the sanders to do their thing! I sanded for about 35-40 minutes today with 80 grit then 120 grit.
I get sloppy when I get tired, so I put the sander down for now and will resume Monday.

I set the router to a maximum cut with my bit. The bit is actually a Roman Ogee bit but when set as I have it, it simply rounds the edge. It has a bearing on the end to allow freehand cuts. The router has been so long mounted to the router table, I had to find the lower plate! 

I had no idea how hard it would be to run the router around the top of the countertop to round the edges! I don't mean it was physically hard, its just that a router can cut wood really fast and any slip-up and two weeks hard work is down the drain! The only time I've had similar feelings of impending doom was when I "Dutched" an entry door in Greenfield house! Cutting a $250 door - keep in mind this was 1977! - was incredibly hard!  But, as then, I double and triple checked everything and "let 'er fly!" Turned out great!

I did lower edge and corners as well

I followed up with about an hour of sanding with the Black & Decker orbital sander with 80 grit paper. Tomorrow, I'll load 100 grit, then 120.
I could be varnishing by Wednesday!
It is looking amazing and I am so happy I learned on the rollaround top!

I saw my good friend at church today and he suggested not to use 80 grit at all but to get through the 120 grit and then on to higher grits quickly. Since my finishing experience is extremely limited, I tried Jim's suggestion and it worked quite well! I think the heavier grit had actually been making most of the marks I was trying to sand out! So tonight, I used some 220 followed by 320 grit paper and it is turning out amazing! Jim said he does his finish sanding with 1500 grit. I checked and we have quite a supply of 600 grit but nothing finer. We used all the really fine stuff when we painted the Camaro a million years ago! So I'm thinking the final sanding will be with 600 grit. But there's still a lot to do with the 220 & 320.

Now I need to tap one of my friends to come over and help me gently flip this baby over so I can sand the bottom!
This baby could go into service by the Fourth of July!

Saturday, June 15, 2013

Island Structure Layup Complete!

Island Structure Layup Complete!

The last of the clamps are back in their storage position and its time for the sanders to do their thing!

The last of the band boards is in place and the layup is "curing."

With the clamps removed, about 20 minutes with 80 grit on the belt sander removed almost all the stains and glue! 

This shot is from nearly directly overhead (using a 6' step ladder). I changed to 120 grit (finest belt sandpaper I could find) and sanded another 20 minutes or so. I get sloppy when I get tired, so I put the sander down for now and will resume Monday. 

Next - Sanding, more sanding, even more sanding, then finish sanding with the B&D orbital sander!  Then, varnish!

Wednesday, June 12, 2013

Island Structure Nearly Complete


Island Structure Nearly Complete

Adding courses was very straightforward with the only added complexity being a 3-D clamping requirement – I had to press the flooring tightly to the subfloor, squeeze against the previous course, and squeeze end-on to make sure the courses made up of 2 pieces of flooring were tightly bonded.

The final courses are added to rim the cooktop cutout. I decided to piece the final courses since the edge was thin and the structure is supported there by the cabinet base.


Try as I might, there was enough variation in the ends that a tight glue joint was not to be. So I clamped a piece of ¼” plywood to the top, using an old piece of laminate to fill in the cutout area. The plywood was clamped with the “factory” edge as the guide since it would be the straightest. The thin wood was needed due to the large overhang of the hand saw motor.  Final step in prep was to apply a layer of masking tape. The tape needs to be down tight to help prevent tearouts of the flooring as the saw blade passes up through.  I also set the depth of cut to a minimum to keep the angle of the blade at a minimum as it exits the work.

Here trimming the south end.

Once all the trimming was done, it was time to cut the bandboards to the proper width.  In anticipation, I added a dust collection system to my table saw.

The dust passes through a vortex swirler that settles about 90% which keeps the shop vac from getting clogged with sawdust so quickly.  I’ve used this dust collector with the jointer/planer seen here for quite a while but just now added it to the saw.

I set the ripping fence to the desired width and passed all four pieces through in sequence to insure uniformity.  As you can see, I am old school and don’t use my blade guard. I DO NOT RECOMMEND THIS PRACTICE!

Here is the east side band board during trimming to length.  I used the pressure clamps as a third hand to hold the piece since I am working alone. 
I decided to use my biscuit jointer to attach the band boards since the dowels were not very satisfactory. I set the Dewalt biscuit jointer to just above the center of the flooring and depth for a #10 biscuit.

I clamped the bandboard on the piece and marked for a biscuit every 10”. Then I cut the slots. The band board itself was more difficult since it is unattached. I created a stack using a 2X6 scrap and a piece of ½” plywood to create a backing piece. Then I could align the cutter properly.

Here is the result for the east band board.

The biscuit jointer leaves a small exit tear-out which I remove with a knife to keep it from getting in the way of a tight glue joint.
Here is the east band board during dry-fitting – you can see the biscuits in the near end. 

Here, both east and west band boards are glued and clamped.

Same scene only seen from the north end (BTW: north – south – east – west alludes to ultimate orientation in kitchen).

Tomorrow – Cut and glue North & South band boards! 
Then, trying to master the belt sander!

Wednesday, June 5, 2013

Six Courses Commplete!

The island is coming along nicely!
After the first couple of courses, it was clear I would need additional deep throated C-clamps, so on Sunday, we stopped by Harbor Freight and picked up two more, giving a total of four. I can still use the 2X4 with standard 5" C-clamps in a pinch, but these will be well worth the $10/clamp they cost!
This three dimensional clamping is challenging!
I have developed a method that seems to work well:
1) align and clamp the length, squeezing toward the last full course until the glue oozes the entire length of the joint;
2) Clamp center joint using pipe clamp, same criterion - oozing glue;
3) Clamp vertically using dimensional press pieces and C-clamps at least six places (every 8-10 inches) until glue oozes from under board.
This morning, I laid up course #6 with a 22" and a 47" piece. The 22" pieces was straight and flat but the 47" piece had a little bow (about 1/8"). Fortunately, the bow was away from the 5th course (when center was tight, end stood out), so I used a 3/4" pipe clamp to secure inboard end and the n used another 3/4" pipe clamp to draw the end tight. I used the 1/2" long pipe clamp to then draw center joint tight, and used pieces of 2X4 to clamp vertically (the long 2X4 would not slip under the pipe clamps).
Tomorrow I will lay up last full course.
After that, I have decided to use a partial piece (the length of the cutout), ripping it on the table saw and end butting it with a parial piece to complete the course. Then, a series of 21" pieces (which I may try to lay up 2 or even 3 at a time.
Photos at that point! 
Thanks for following this blog!
Feel free to leave comments.
 

Saturday, June 1, 2013

Phase II – The Island Structure


Phase II – the island structure (sounds like something from an aircraft carrier!)

We spent a few minutes with some short pieces of flooring to check out our layout. Using the actual wood was valuable since sketches and measurements can go awry, but a block of wood is pretty definitive!

We sat the Advantech subfloor up on the sawhorses and marked the cooktop cutout using a Sharpie marker.

Using the same techniques detailed in my earlier blog, I prepared the first course using the table saw to strip the tongue and the planer/jointer to produce a flat, smooth edge. The first course is always a solid piece if at all possible! 
Using the Ryobi power miter box, I cut the ends for a perfect fit.


After extensive checks and counter-checks, I was satisfied the piece was as properly aligned as my “finger feeler-gauges” could achieve and I clamped the piece using a 2X4 top board.


Once the first course glue set overnight, I was ready for the second course.


I made an access cut along the edge of the cook top cutout but left plenty of “meat” to allow a strong piece. The cutout simply allows clamps to be applied a little closer. 

Here’s the second course glued and laid up. I selected a 2X4 that has a slight bow as a top clamp press board. I placed the peak of the bow in the center and as I clamped the ends, the bow helps keep the piece tight against the subfloor. The tongue & groove will keep the close edge contained. To make sure the far edge is intimately bonded with the subfloor, I used the same “spring clamp” I used with the rollaround – a piece of 2X4 loosely clamped at close end and more firmly clamped at far end. The result is additional down force on the far edge.
A pipe clamp keeps the join seam tight (the second course is comprised of two boards). Edge clamping brings the second course in intimate contact with the first.


Liberal use of release sheets (plastic grocery bags) will help insure I do not accidentally glue a pressure block to the maple flooring!


A couple of 12” deep throat C-clamps help reach the work more easily. They won’t hold the same clamping force as the normal C-clamps, but they are sufficient.

Long shot of final layup for second course.

Next - Additional courses will be done similarly and I will not update as I go unless I change some method or other.

Finito! At least for the learning phase!


Finito! The learning phase is complete!

Here is the final product. There are a few “warts” that are not readily evident. But that’s why I did the rollaround top first! To learn.


My son David came over and carried the top up (I could have but it exceeds the limit my doc said to put on my new knees!) We installed it using L-brackets and cap screws. Looking pretty good!


Next – Phase II – the island structure (sounds like something from an aircraft carrier!)